Before diving head first into implementing Chronos for our platformer, it's worth taking a minute to understand how each of its parts works.
Just like any Unity game, Chronos works with components that you attach to GameObjects. In total, it provides 6 easy components that, when combined correctly, make the magic happen. In this section, we'll cover each of them briefly; we'll get back to the details later in the tutorial.
Don't worry if you have trouble understanding the whole structure of Chronos at first! It will become much clearer once you start experimenting with it. In fact, using Chronos is much simpler than it seems.
At its root, Chronos requires a single Timekeeper object, which is basically just a registry for global clocks. It must be present in every scene.
More importantly, Chronos functions with Clocks. A clock is exactly what you would expect it to be: a component that ticks at every frame (based on its speed, i.e. its time scale) and gives you time measurements. In Chronos, there are 3 types of clocks: global, local, and area.
To 'read' time measurements from one or many clocks, each GameObject must use its own Timeline component. Quite literally, this means every object can progress on its own specific timeline, instead of just one global timeline. This allows for a variety of interesting time effects and gameplay mechanics
Component
Description
Timekeeper
The timekeeper is a singleton tasked with keeping track of global clocks in the scene. One and only one Timekeeper is required per scene.
Clock (Abstract)
The base class for every other type of clock. It has a timeScaleproperty to adjust at what speed its time progresses. Any clock can also have a parent global clock with which it will multiply its own time scale.
Global Clock
Global Clocks are clocks that can be accessed and referenced from anywhere by a unique string key (e.g. "Enemies", "World", etc). They must always be attached as components of the Timekeeper object. They are the only kind of clock that can be set as parents of other clocks. They can be used to apply time effects to groups of objects.
Local Clock
Local Clocks are clocks that apply only to the GameObject to which they are attached. They can be used to make individual objects progress at different speeds.
Area Clock
Area Clocks are clocks that affect all GameObjects within their collider. Their effects stack with any other clock these objects might be observing, and with any overlapping area clock. They can be used to apply time effects to a restricted area.
Timeline
A Timeline combines measurements from one or more clocks to provide a single but independent time, delta time and time scale for every GameObject. It should be attached to every GameObject that should be affected by Chronos.
You can learn more about each component from the API Reference.
Example
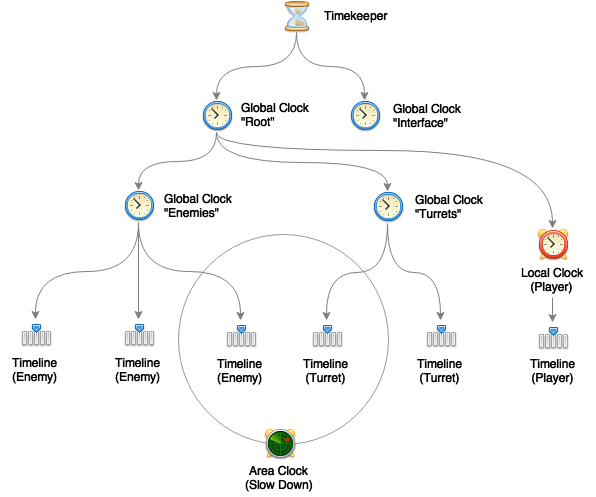
Here's a diagram that shows an overview of how a sample Chronos scene could be configured, in this case a tower defence game:
So, what's going on in this Chronos setup? First, we have our Timekeeper singleton at the top. In it, we registered 4 global clocks (Root, Interface, Enemies and Turrets) with parenting.
The Root and Interface clocks are separate, because we want our user interface elements to behave on a constant time scale (most likely always 1), without being affected by the game's time scale. This way, for example, we can pause the game by setting the Root clock's time scale to 0 and still have an animated menu pop out.
We then have two children of the Root clock, Enemies and Turrets. In our tower defence game, we probably want to be able to affect enemies independently from turrets. This would allow us, for instance, to have an ability that accelerates all turrets while maintaining the enemies at their regular speed.
Then, we configured a local clock that only affects the player avatar. Since there is only one player in the scene at once, there is no need for a global clock.
Each of our GameObjects (3 enemies, 2 turrets and 1 player) has its own timeline. This timeline observes any clock to which we made it point and returns the combined measurements that the GameObjects use for gameplay.
Last but not least, at this moment in the game, we used an ability that created a spherical area clock that encompasses the third enemy and the first turret. By setting this clock's time scale between zero and one, these objects will be slowed down.
Back to the tutorial
If all that seems overwhelming, don't worry. Indeed, adding time control to your game is literally a whole new dimension to think about. However, Chronos is built to make that process as easy as possible. We will go through each step in the course of this tutorial.
The structure we will create in this tutorial is a simplified version of the one above. Basically, we will only affect enemies and their spawners. All other objects in the scene (player, missiles, background elements, etc.) will be left untouched, meaning they will progress at their regular speed through Unity's Time class. Here is the diagram for the structure we will implement
If you've made it this far, you've completed the hardest part of the tutorial — congratulations! Now go grab some coffee, and let's control time!